Login
1. Login from https://login.microsoftonline.com/. Enter admin login and password.2. From the Home page, select Admin.
Manage Domain
3. From the Office 365 Admin Centre, click dashboard and select Manage domains for your website and your email.
Or alternatively, select Setup and click Start under Basic Setup.
4. If you have selected the 1st option (dashboard, Manage domain), customer will see this page. Click Add Domain.
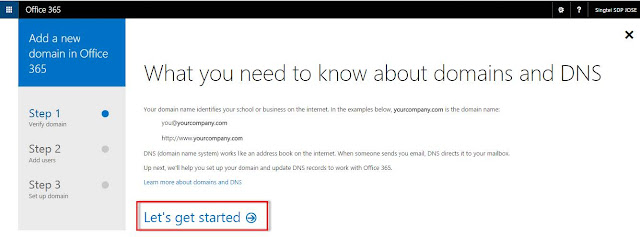
5. You will see this page and click Let’s get started.

6. Enter your domain name and click Next.
7. To validate that you own the domain name, update the TXT or CNAME record from your DNS portal. If you currently do not have access to change your own domain name, coordinate with your DNS provider and provide the details below for them to update. Once done, click Okay, I’ve added the record.
8. The system will verify that the TXT/CNAME record has been updated. Click Next.
Add Users
9. This page will enable customer to add users. Note that the email address already reflects the domain name customer just setup.
 |
| Office 365 Admin Starter Guide |
If you have purchased more than 1 basic pack, you can select which Basic Pack this user should be assigned from the list and click save. Customer can select No license if they just want to create the users first and choose to assign the licenses later.
 |
| Admin User Guide |
Also, you have the option to create bulk users or just add one by one.
Once done, click Add these users.
10. You will see a confirmation that user has been added successfully. Click Next to proceed.
Update DNS records
11. You then need to update the DNS record. Click Next.
12. Select which services you want the domain name to be used.
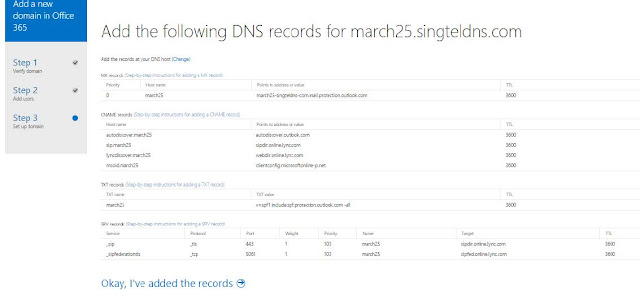
13. Update the DNS records at your DNS portal or you do not have access, inform your DNS provider to update it for you. Once done click Okay, I’ve added the records.
14. Once all records have been updated, click Finish.
15. You will be back at the admin centre Domain page and you will see that the domain you setup is the default domain name of the account.
Assign License
16. If in an earlier stage where you did not assign the user to any of the Office 365 license, you can go back to see all the active users from the Office 365 admin centre. Select the user, click edit under Assign License.
17. Select the plan with available license and click save.
Share This :


comment 0 comments
more_vert